
This is my 14th painting. Please enjoy my tutorial “Lilac Pond” by John O’Keefe Jr.
Composition and Materials – “Lilac Pond”

Jennifer and I took a road trip to capture some beautiful park scenes in the Wallingford area. We took this picture near our home at one of the town’s protected areas in the Open Space Project. This was the perfect backdrop for the next painting.

I wanted a large tree off to one side of the painting, a common element in many Hudson River School paintings. Not satisfied with any of the photographed trees from our road trip, I turned to the Internet for reference material. While searching, I came across a beautiful set of trees in an old Victorian engraving. Using digital image editing software (Adobe Photodeluxe), I removed unwanted areas from the engraving image and merged the two images into this composite.
- Support: Stretched Fine Linen (Oil Primed)
- Size: 16 x 20 inch
- Medium: Winsor & Newton Artist Oils Professional Grade Oil Paints
(Ivory Black, Titanium White, Corelian Blue, Sap Green, Naples Yellow, Raw Sienna, Burnt Sienna, and Vandyke Brown) - Finish: Winsor & Newton Dammar varnish
Step-By-Step Tutorial – “Lilac Pond”
Days 1-3
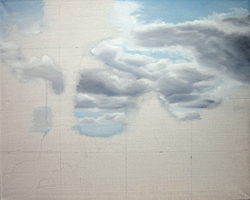
I drew a pencil grid pattern onto my canvas that matched a corresponding grid on my reference photo. Thus, I could reasonably position elements from the photograph to the painting. You can make out the reference lines in the image. As always, I started painting the farthest objects in the scene, the clouds.
Days 4 & 5
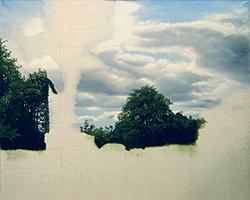
I had started to lay out the mid-line trees. At this point, I realized I was displeased with the original composition. I wanted to keep the big trees from the engraving but not the others.
Day 6

I finished laying out the mid-line trees. I was still unable to decide what to put on the right side of the painting. My idea of a field and farmhouse did not feel right anymore. Now I wanted water, a pond in place of the field. I also thought of adding birds, a tight closeup of Hummingbirds sitting on a branch and admiring the area they call home.
Day 6 (Digital Edits)
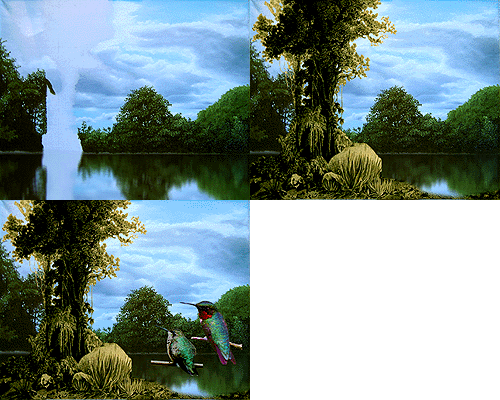
Using Adobe Photodeluxe, I worked out my new ideas on the computer and produced this new digital composition. You can see that I cut back more of the engraving features from the right side, exposing the pond. The two Hummingbirds would look well placed to the right.
Day 7
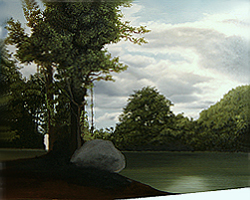
Now came the big trees on the left. I blocked in the large boulder and dirt ground. I was not entirely pleased with my pond because it did not have the glassy surface feel I achieved in the digital composition. However, I was content enough to move on.
Day 8
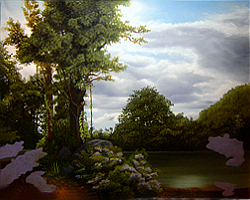
It had been about three weeks since I had last worked on the painting, and I again decided to make composition changes. This time I wanted Lilac bushes in the foreground and not the birds. I searched the Internet for photographs of Lilac bushes that fit nicely into my painting. In this snapshot, I completed painting the shrubs in the middle and started blocking in the purples that will become the remaining Lilac bushes on either side.
Day 9

More detail was added to the Lilac bushes on the left and right sides. I also added more highlights to the Lilacs in the middle.
Day 10
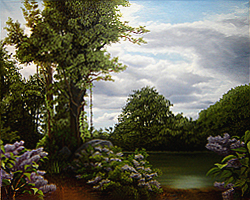
Just about done. I added the leaves to the Lilac bushes. I took great care to get the shadows right, but my wife said something interesting. She thought the light green trees on the right side (behind the row of trees along the pond shore) were a tree overhanging the pond and not distant hills as I intended.
Day 11
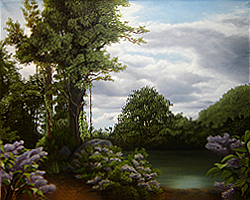
I decided that a few minor touch-ups would be good. I agreed with her assessment, removed the light green line along the far pond shore, and increased the contrast between the mid-line trees and the distant hill on the far right.
Finished Painting – “Lilac Pond”

I hope you enjoyed my tutorial “Lilac Pond” by John O’Keefe Jr.
